Every family has its own criteria for what makes a Christmas dish a keeper, but I like to say that these recipes must sing in the right key — that they must be made the same way, year after year. We might even have sentimental platters and bowls that we pull out of the breakfront solely to serve them. The appearance of those plates is as sure a sign that the holidays are in high gear as putting up the tree.
And here’s a secret: A recipe doesn’t have to be perfect to be perfect for us. Some of the best family tales are about the “oops” moments and old-school ingredients that become part of the story of us. Joy is joy, sometimes with a Day-Glo maraschino cherry on top.
Glamorous new cookbooks burst with holiday inventions, and some of that stuff sure is tasty, but for the big-ticket holiday meals, we crave our tried-and-true favorites.
So we pull out the recipes that someone handwrote on a little card or on the back of an envelope: love letters to the next cook to take the helm.
Here are five vintage recipes that sing in an everlasting Christmas key on many North Carolina tables. If these don’t turn heads and tug heartstrings at your house, I hope they’ll remind you of dishes that do.

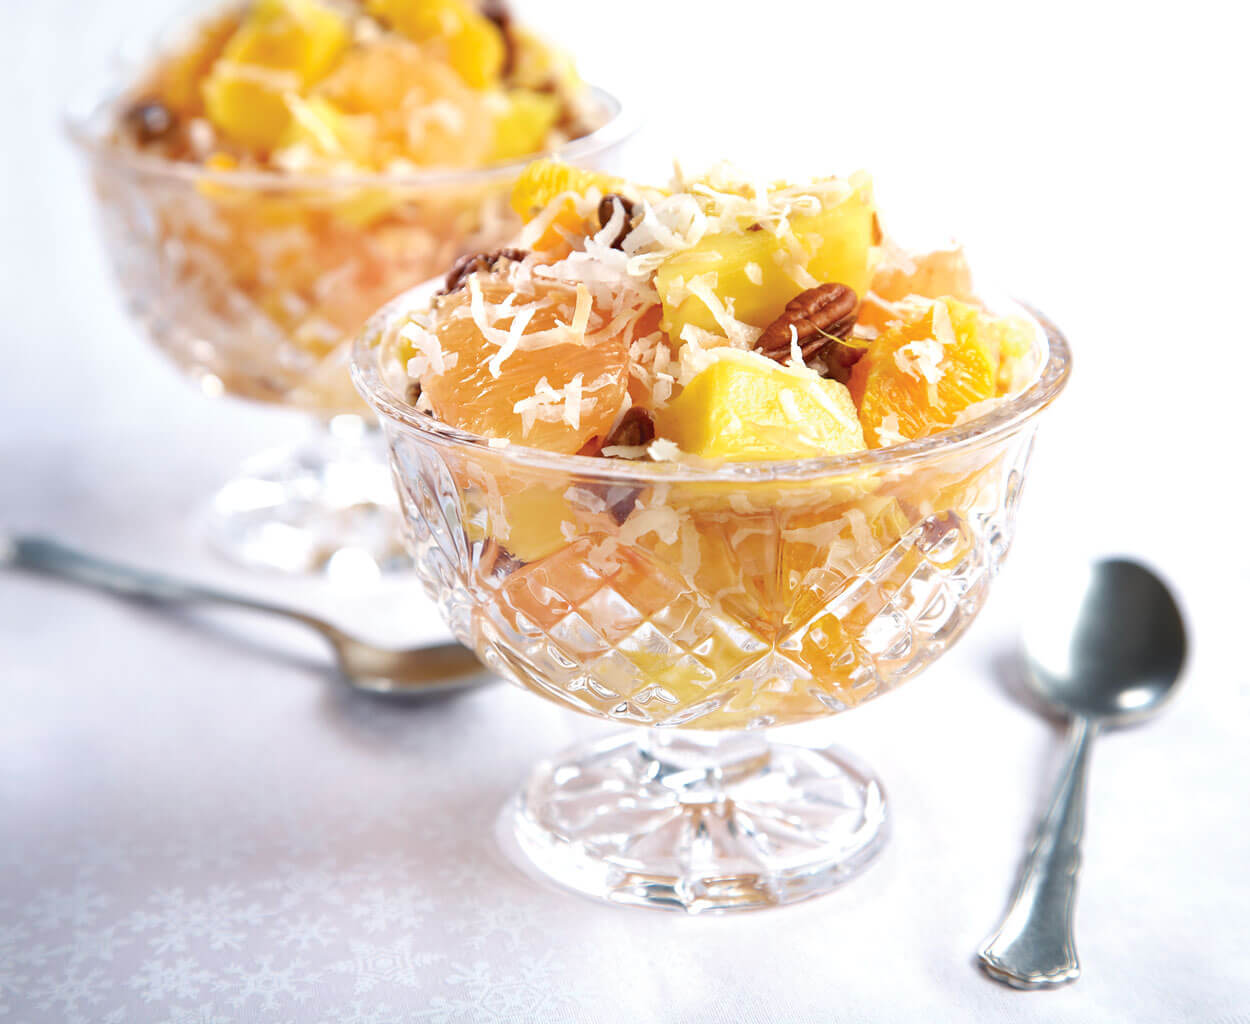
Ambrosia was such a treat that many families reserved a cut-glass or crystal bowl solely for displaying and serving it. photograph by Matt Hulsman
Ambrosia
To appreciate the old-fashioned appeal of this fruit salad, recall that fresh citrus used to be a rare treat in North Carolina, available only once a year, when people would fetch crates of fruit from warmer climes during the winter. Remember how your grandparents reminisced about finding an orange in the toe of their stockings? It must have felt like pulling out a handful of sweet-smelling sunshine. So imagine the opulence of having a whole bowl of these bright, sweet fruits. (Plus pineapple and coconut all the way from the tropics!) Ambrosia was such a treat that many families reserved a cut-glass or crystal bowl solely for displaying and serving it.
Yield: 8 servings.
1 cup shredded fresh coconut or sweetened flaked coconut
1 cup chopped pecans
2 grapefruits, preferably one pink and one yellow
4 sweet oranges
1 small pineapple, peeled, cored, and cubed
Sugar to taste
Preheat oven to 350°. Place the coconut and pecans on separate rimmed baking sheets and toast, shaking the pans once or twice, until they are lightly colored, 5 to 10 minutes. Immediately transfer each to separate plates to cool.
Use a sharp, thin-bladed knife to cut just enough of the tops and bottoms off the grapefruits to expose the flesh. Set the grapefruits facedown on a cutting board and slice off the peel and pith, following the curve of the fruit with the knife. Working over a bowl to collect the juice, cut between the pith to release segments into the bowl, discarding any seeds. Repeat with the oranges.
Add the pineapple. Add the coconut and pecans, reserving about 2 tablespoons of each. Gently toss to combine. Taste the ambrosia and sweeten to taste with sugar. Serve immediately or cover and refrigerate for up to 1 hour. Just before serving, sprinkle the reserved coconut and pecans over fruit.

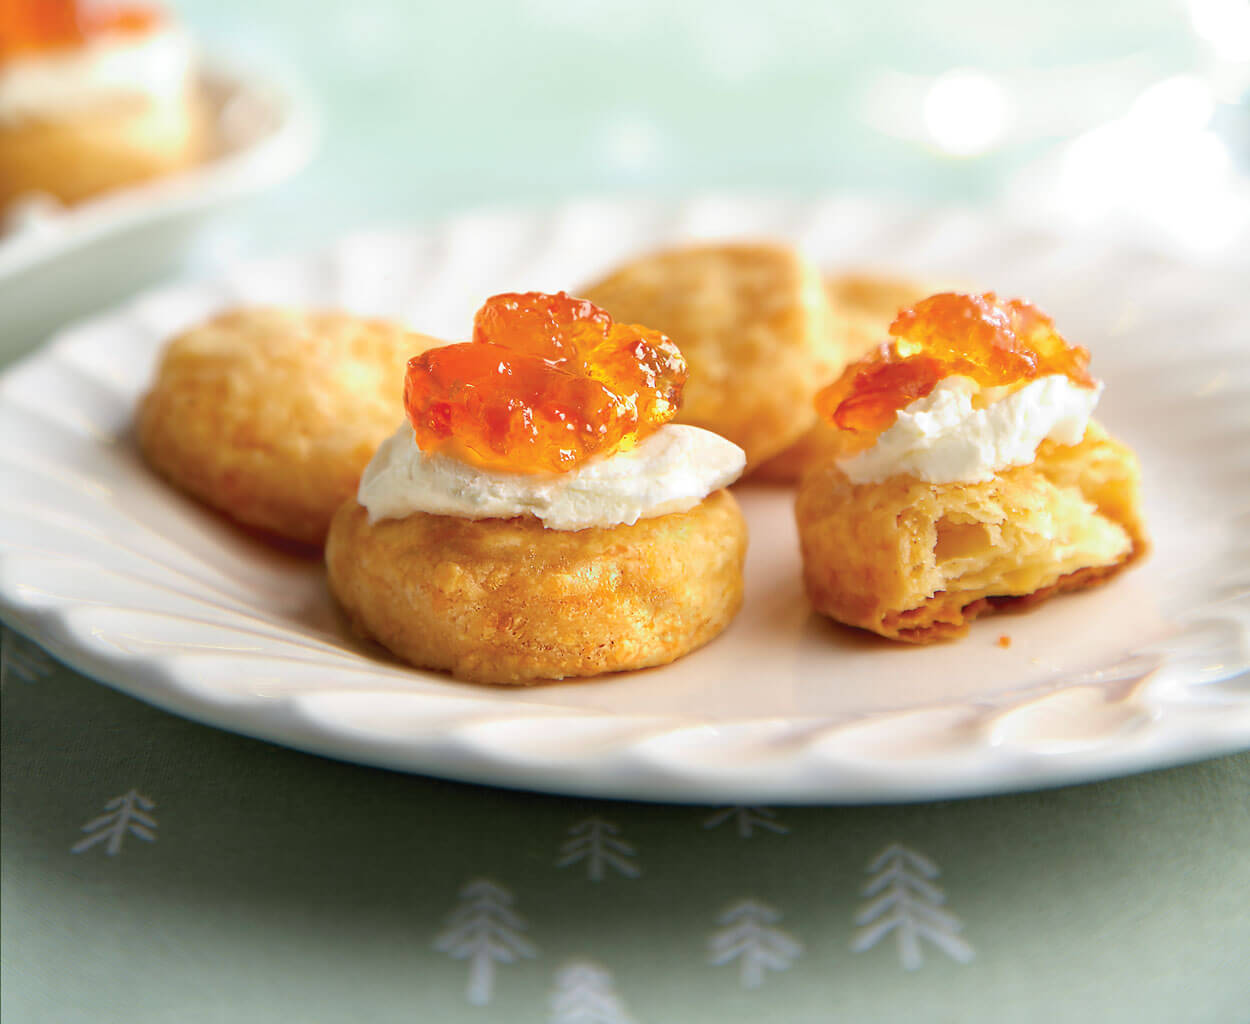
No party is complete without these bite-size appetizers. photograph by Matt Hulsman
Cheese Coins With Cream Cheese & Pepper Jelly
It’s just not a Southern party if there’s not a tray of something tasty spooned over a block of cream cheese. What puts this particular combo over the top are the irresistible salty, sharp, ever-so-slightly spicy, bite-size crackers known as cheese coins. There’s no tastier tidbit to ferry that smear of cream cheese and a dab of pepper jelly from a festive cocktail napkin to our lips. The recipe makes about 60 coins, but odds are that at least half of them will never make it to the table, gobbled instead straight off the baking sheet. Better double up.
Yield: 5 dozen.
8 ounces extra-sharp yellow cheddar cheese
4 ounces extra-sharp white cheddar cheese
1½ cups all-purpose flour
1 tablespoon cornstarch
1 teaspoon salt
¼ teaspoon cayenne pepper
¼ teaspoon paprika
8 tablespoons unsalted butter, cubed and chilled
6 tablespoons ice-cold water
1 (8-ounce) block cream cheese at room temperature (for serving)
1 (8-ounce) jar pepper jelly (for serving)
Shred the cheese on the large holes of a box grater or with the shredding dish of a food processor. Place the cheese, flour, cornstarch, salt, cayenne, and paprika in the bowl of a food processor and pulse to combine. Scatter the cubes of butter over the cheese mixture and pulse until the mixture resembles wet sand. Sprinkle the water over the flour mixture and pulse until clumps begin to form.
Pour onto a surface lined with parchment paper or waxed paper, and gather into a ball. Flatten to a disc, cover with a second sheet of parchment, and roll to a ¼-inch thickness. Stamp out rounds with a 1½-inch cutter. Gather and roll the scraps and stamp out rounds until all of the dough is used.
Arrange the rounds on two baking sheets lined with parchment paper or a silicone baking mat, spacing them at least 1 inch apart. Cover with plastic wrap and chill until firm, at least 1 hour and up to overnight.
Position oven racks in the upper and lower third of the oven and preheat oven to 350°. Bake the coins until they are just set and light golden brown around the edges, 22 to 25 minutes. Do not overbake. Set the pans on wire racks and let stand until coins are cool. Store at room temperature in an airtight container for up to 3 days.
To serve, unwrap the cream cheese and place on a serving tray. Spoon pepper jelly over the top of the cream cheese or into a bowl. Serve alongside the cheese coins.

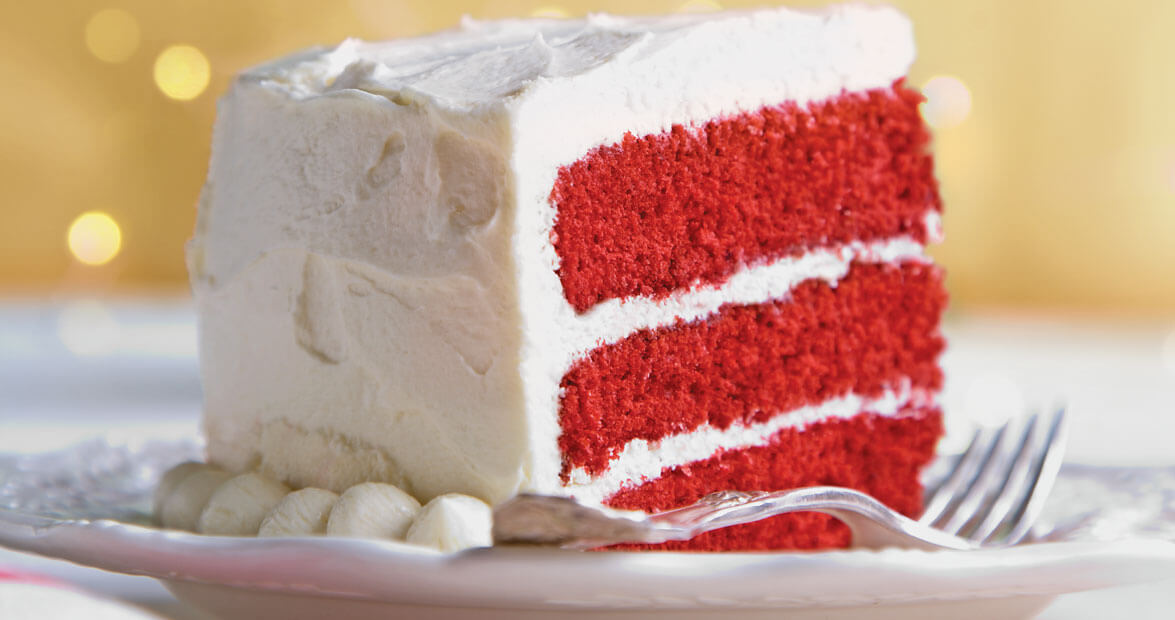
No holiday is complete without a jolly red velvet cake. photograph by Matt Hulsman
Red Velvet Layer Cake With Ermine Frosting
Shhh. Don’t tell a soul, but red velvet didn’t originate in the South. Never you mind. We quickly adopted the cake with such devotion that it feels like our own. Classic red velvet never shines brighter than at Christmas, when its brilliant red layers and fluffy white icing serve as a centerpiece, especially when perched on an heirloom cake plate with a domed glass lid, like an edible snow globe. This recipe includes traditional ermine icing — an unusual concoction that begins with a cooked flour mixture instead of the cream cheese that’s popular these days. Some hand-me-down recipe cards call this frosting “gravy icing” because cooks stirred it up in their trusty skillets.
Yield: 12 servings.
For the cake:
Shortening and flour for the pans
2¼ cups all-purpose flour
½ teaspoon salt
½ cup unsalted butter, at room temperature
1½ cups granulated sugar
2 large eggs
1 cup whole buttermilk
1(1-ounce) bottle (2 tablespoons) red food coloring
3 tablespoons cocoa
1 teaspoon vanilla extract
1 teaspoon baking soda
1 tablespoon distilled white vinegar
For the frosting:
1 cup whole milk
⅓ cup all-purpose flour
1 cup granulated sugar
½ teaspoon kosher salt
1 cup unsalted butter
1 teaspoon vanilla extract
For the cake: Preheat oven to 350°. Grease three 9-inch cake pans. Line the bottoms with parchment paper and grease the paper. Dust the pans with flour, tap out the excess, and set aside.
Sift together the flour and salt into a medium bowl. In a large bowl, beat the butter until soft and creamy with a mixer set to high speed, about 2 minutes. Add the sugar and beat on high speed until light and fluffy, about 5 minutes. Add the eggs one at a time, beating well after each addition. Add the flour mixture in thirds, alternating with the buttermilk, beating on medium speed only until the batter is smooth after each addition. Scrape down the sides of the bowl between additions.
In a small bowl, stir together the food coloring and cocoa to form a paste. Add to the batter and beat on low speed until incorporated. Quickly beat in the vanilla. In another small bowl, stir together the baking soda and vinegar. It will foam vigorously. Quickly stir, by hand, into the batter.
Divide the cake batter evenly among the prepared cake pans. Bake only until firm on top and pulling away from the sides of the pan, 16 to 18 minutes. A tester inserted into the center will come out clean. Let cool in the pans on a wire rack for 5 minutes. Turn the layers out on the rack and turn right side up to cool to room temperature.
For the frosting: In a small saucepan, whisk together the milk and flour until smooth. Whisking constantly, cook over medium heat until it reaches the consistency of pudding. Remove from heat, add the sugar and salt, and whisk until the sugar dissolves. Scrape into a small bowl, press a piece of plastic wrap or waxed paper directly on the surface to prevent a skin from forming, and let stand until it cools to room temperature. (If your kitchen is warm, place the bowl in the refrigerator for about 30 minutes.)
In a large metal bowl, beat the butter with a mixer set to medium speed until light and creamy, about 2 minutes. With the mixer running, add the flour mixture in heaping spoonfuls. Beat in the vanilla. Scrape the bowl with a rubber spatula. Switch to the whisk attachment if your mixer has one. Beat the frosting on medium-high speed until it is light and fluffy with the consistency of stiffly whipped cream. Use immediately.
To assemble: Place one layer on a cake plate or platter. Spread about ½ cup of frosting over the top. Add a second cake layer bottom side up and spread about ½ cup of frosting over the top. Add the third layer, right side up. Spread the remaining frosting over the top and sides of the cake.
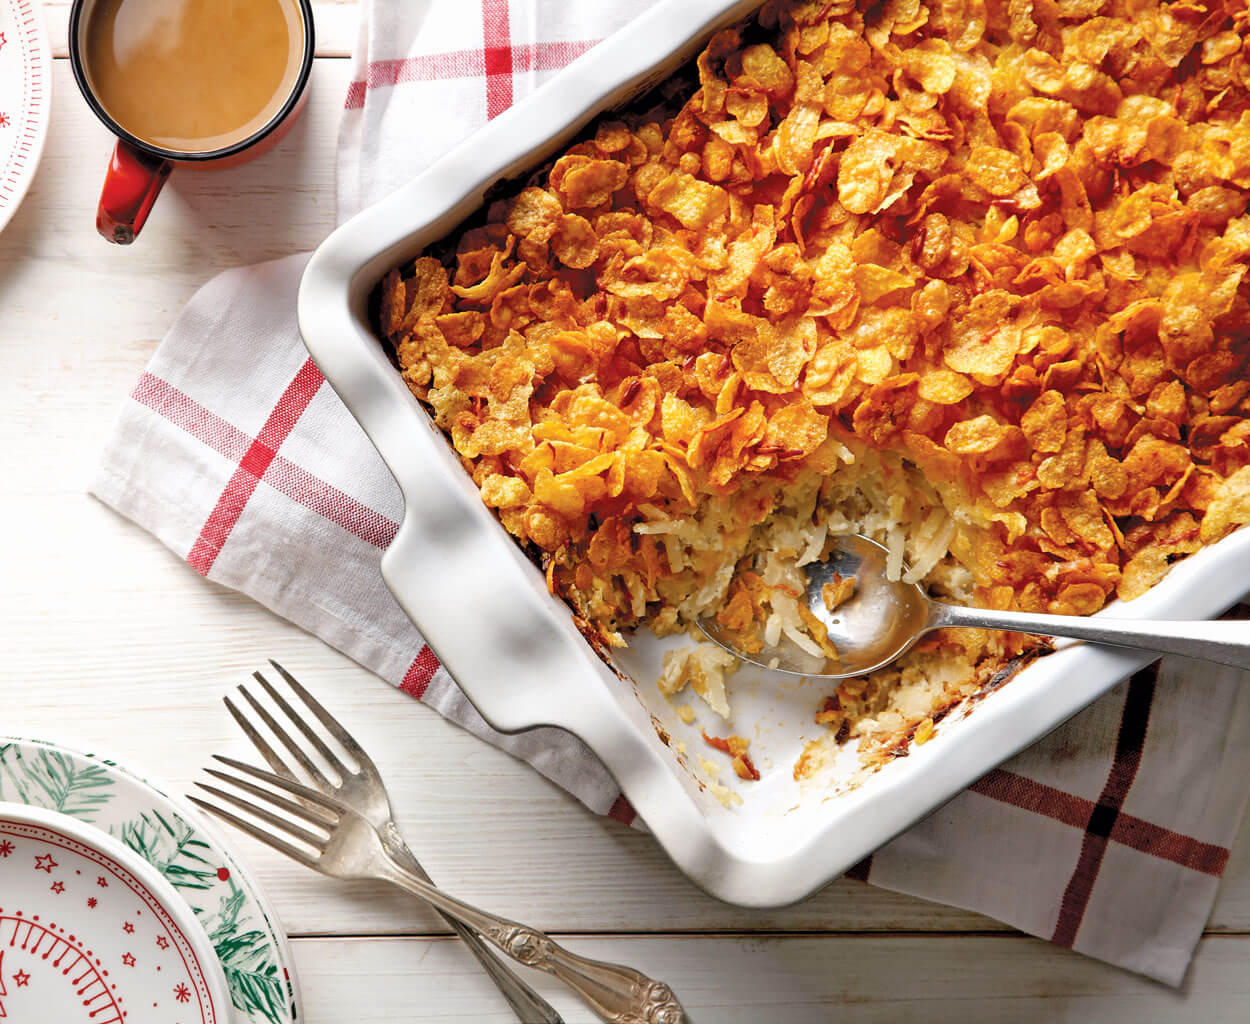
photograph by Matt Hulsman
Hash Brown Casserole With Cornflake Topping
There aren’t all that many silent nights during the Christmas season. Halls must be decked, stockings hung, carols sung (since Labor Day, it seems), and then there are all those treks to the store for just one more thing that was forgotten when we were there earlier. Eventually, the moment comes when it’s time to actually have Christmas instead of getting ready for it. For me, that’s in the sweet stillness of Christmas Eve night. When everyone else is sound asleep, I mix up a breakfast casserole to tuck into the fridge before bed. The next morning, while we open gifts, it bakes and bubbles. My daughter and I devour it with delight and gusto — but only once each year. Making hash brown casserole is my holiday ritual because, at my house, many of the ties that bind are apron strings.
Most of my heart is filled with love for my two favorite people I’ll ever know: my grandmother, whom I called Mama, and Lily, who calls me the same. Mama wasn’t a fancy cook, but she was a brilliant one, making incredible meals from the big garden that she tended and groceries from the Winn-Dixie. When Mama went to see her only sister up in Indiana, she’d return with a heart brimming with joy and a pocketbook bursting with new casserole recipes that she’d jotted down on the back of the envelope that held the light bill and such. One of those recipes was for hash brown casserole. Indiana is flat country, far different from my Blue Ridge Mountain home, so I knew that this dish was exotic from the first bite.
A few decades later, I had a baby who needed to be not only fed, but also nourished by family traditions. It’s never too late to begin a tradition, so when Lily was a toddler, I started making the casserole for us to eat on Christmas morning. We gobbled it in the living room, by the glittering light of the tree, kicking our way to the sofa through the tumbleweeds of paper and ribbons left from tearing open our gifts.
I’ve never skipped a year, even the hard ones when grief and loss were duking it out with holiday joy. Each year, when I take that first bite, I think: Wow, this stuff is good. And: Wow, here it is Christmas again. Then: Wow, my daughter is already 2, or 10 — or grown. It happens in the twinkle of Santa’s eye
Yield: 8 to 12 servings.
Butter or cooking spray for the pan
32 ounces frozen diced or shredded hash brown potatoes, thawed
12 ounces extra-sharp cheddar cheese, shredded (about 3 cups)
1 (10-ounce) can or 1 (12-ounce) box cream of chicken or celery soup
2 cups sour cream
1 teaspoon flavored (such as Lawry’s or Old Bay) or regular salt
1 teaspoon granulated garlic
½ teaspoon ground pepper
2 teaspoons hot sauce, such as Texas Pete, or to taste (optional)
2½ cups cornflakes
¼ cup shredded parmesan cheese
6 tablespoons butter, melted
Preheat oven to 400°. Lightly butter a 9 x 13-inch baking dish or mist with nonstick cooking spray.
Stir together potatoes, cheddar, soup, sour cream, salt, garlic, pepper, and hot sauce (if using) in a large bowl. Spread the mixture into the prepared baking dish.
Note: At this point, you can proceed with the recipe or cover and refrigerate overnight, which is what I do on Christmas Eve.
Bake (uncovered) until golden brown on top and bubbling around the edges, about 40 minutes.
Toss together cornflakes, parmesan, and melted butter in a medium-size bowl. Sprinkle mixture evenly over the casserole. Continue baking until cheese melts and topping is golden brown and crunchy, about 15 minutes.
Let stand 15 minutes before serving.
Simple Oyster Stew
Oyster stew isn’t all that pretty, but it sure is a beautiful sight to behold on a Christmas table. Why Christmas? These days, it’s a nod to family tradition, but for many of our grandparents and great-grandparents, both Christmas and fresh oysters came along only once each winter. Back when the duration of a trip inland from the coast was measured in days, winter was a wiser, safer time to ship fresh oysters to the Piedmont and mountains. There were — and still are — wonderful flavors in the native foods of those places, but none of them tasted of the sea. And no food tastes of the sea more than a freshly shucked oyster. That annual oyster stew must have been an exotic experience, one that earned it a spot on holiday wish lists for a lifetime.
Yield: 4 to 6 servings.
2 pints freshly shucked oysters with their liquor
1 quart whole milk
Salt to taste
Lots of black pepper
4 to 6 tablespoons butter
1 bunch scallions, trimmed and sliced (optional, for garnish)
Buttered saltine crackers (for serving)
Strain the oyster liquor through a fine-mesh sieve to remove any grit. Gently rinse the oysters.
In a large saucepan over medium heat, bring the milk to a simmer. Add the oysters and liquor. Return to a simmer and cook only until the oysters begin to curl around the edges, about 1 minute. Remove from heat. Season with salt and pepper.
Place a tablespoon of butter in each serving bowl and quickly fill with hot stew. Sprinkle with scallions, if desired. Serve immediately with saltines.
print it